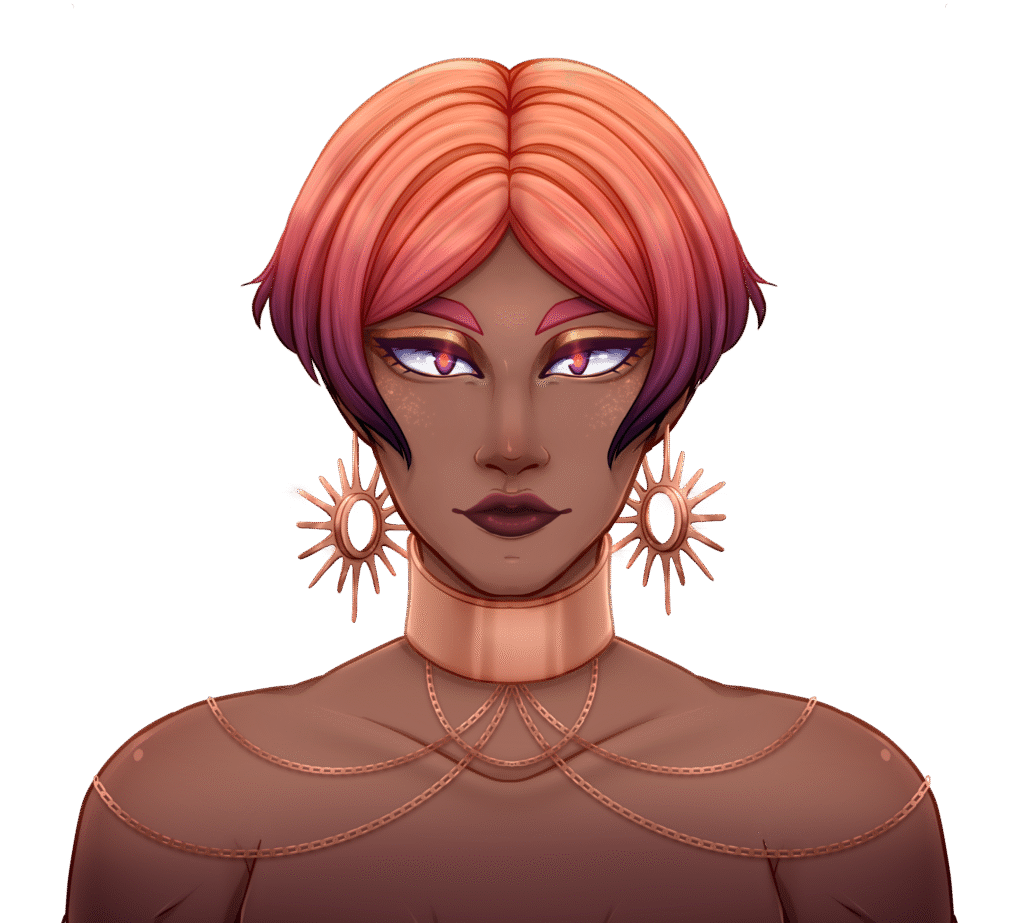
She’s been charging up and is ready to shine with the sunlight. Our newest STUDIO OGIEN release is out! Meet HONOS ILIOSα VCCV, the first major English voice for HONOS OG04.
Watch the release video here!
https://www.youtube.com/watch?v=_7RgFZvqFLg
WHAT IS HONOS ILIOSα VCCV?
Released as an Alpha voicebank, HONOS ILIOSα serves as an exciting taste of what we have planned in the near future. Yes – a full English VCCV Voicebank for HONOS OG04 is currently in the works over at STUDIO OGIEN. This iteration of HONOS ILIOS’s English VCCV is a work in progress, a sneak peek of what’s to come. Crafting a full English VCCV Voicebank is a rather large learning curve and, well, our team is just excited and eager to share HONOS ILIOSα with you all!
The VCCV Additions Continue
VCCV, recognized as the English standard within the Western UTAU community, is at the core of HONOS ILIOSα. Originating from the visionary mind of Cz, VCCV English integrates custom aliases, phonetics, OTO, and distinct UST’ing methods.
HONOS ILIOS (Alpha) Official Artwork By TheStarHeron
Are you curious about how to harness the full potential of a VCCV bank? As a matter of fact, there are many tutorials available to our community! Allow the method’s creator, Cz, to guide you through the intricacies. Visit their YouTube channel for a collection of in-depth tutorials to master VCCV English.
For a seamless experience with HONOS ILIOSα in the original UTAU software, we recommend following the instructional video linked below:
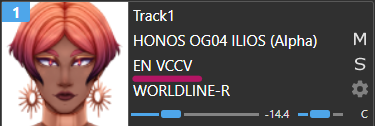
For use in OpenUTAU, a collection of community made phonemizers makes VCCV English easier to use than ever! In other words, like other competitive programs, users can now type in a single English word, and the phonemizer converts that word into VCCV automatically. Simply select “EN VCCV” on the desired track.
We are thrilled to unveil the latest addition to the OGIENOID lineup – AXIS TERRAα VCCV, the first English voice for AXIS OG06.
WHAT IS AXIS TERRAα VCCV?
Released as an Alpha voicebank, AXIS TERRAα serves as a testing ground for our future releases. Providing TERRAα as an Alpha release allows us to test out the girls in a new tongue and provide a fun new voicebank for our audience to use! This iteration of AXIS TERRA’s English VCCV is a work in progress, a sneak peek of what’s to come. The finalized TERRA voicebank will feature new samples recorded on new equipment. However, impatience has driven us to share this alpha version now rather than keep waiting.
The VCCV Additions Continue
VCCV, recognized as the English standard within the Western UTAU community, is at the core of AXIS TERRAα. Originating from the visionary mind of Cz, VCCV English integrates custom aliases, phonetics, OTO, and distinct UST’ing methods.
AXIS TERRA (Alpha) Official Artwork By TheStarHeron
Are you curious about how to harness the full potential of a VCCV bank? As a matter of fact, there are many tutorials available to our community! Allow the method’s creator, Cz, to guide you through the intricacies. Visit their YouTube channel for a collection of in-depth tutorials to master VCCV English.
For a seamless experience with AXIS TERRAα in the original UTAU software, we recommend following the instructional video linked below:
For use in OpenUTAU, a collection of community made phonemizers makes VCCV English easier to use than ever! In other words, like other competitive programs, users can now type in a single English word, and the phonemizer converts that word into VCCV automatically. Simply select “EN VCCV” on the desired track.
Arpasing Voicebanks Collection
Guess what? STUDIO OGIEN just dropped another bombshell – we’ve unleashed a collection of Arpasing voicebanks for everyone to get their hands on! These voicebanks were once created for a private project and thereafter locked away in our vault. We intended for these voices to be merely for experimentation purposes, but we’ve heard the call for their release, and now we’ve followed through!
Each voice is currently equipped with a Moresampler-generated OTO, so there will be bugs and errors. This may change in the future, but for now, they’ve been put out into the world purely for fun. We hope they will bring you enjoyment!
The Collection Includes The Following Characters
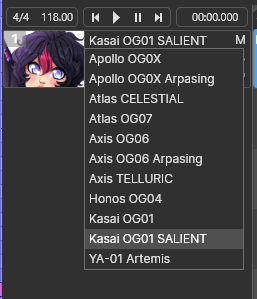
KASAI OG01: Immerse yourself in the fiery tones of KASAI OG01. This voicebank, preserved in the STUDIO OGIEN vault and now for public release, brings a flare of intensity, making it the perfect choice for energetic songs. This voicebank is a tripitch recorded with version 2.0.0 of the original Arpasing reclist. Yes, these voicebanks are very old!
THEIA OG03: Glide through your composition with the beauty of THEIA OG03’s first English voice! With this Multipitch voicebank, your melodies will soar.
HONOS OG04: Honoring our dedication to bringing Honos English to our audience in 2023, we’ve released HONOS OG04’s Arpasing voicebankbank as a placeholder while VCCV Sol finishes up. This Monopitch voicebank captures HONOS’ signature Stoic voice color, expanding the familiar timbre to a new language. Recorded on version 1.0.0 of the original Arpasing reclist.
AXIS OG06: Rotate through your choices of Axis English with this Multipitch English voice! This voicebank is a tripitch recorded with version 2.0.0 of the original Arpasing reclist.
ATLAS OG07: Pivotal changes just keep on coming with Atlas’ first English voicebank! This voicebank is a tripitch recorded with version 2.0.0 of the original Arpasing reclist.
APOLLO OG0X: Step into the future with Apollo OG0X with her first-ever English and Multipitch voice! This voicebank is a tripitch recorded with version 2.0.0 of the original Arpasing reclist.
These Arpasing voicebanks are currently available to download from the links below! In the coming weeks, they will officially be added to each girl’s page. In the coming years, we hope to replace them with updated iterations, so get them while you can!
Summer updates have begun, so here’s our first changelog! We’ve done our belated “spring cleaning”. Lately, we’ve been tidying up older voicebanks and starting work on character pages. As of today, KASAI’s page is updated and ready to go! As she gains more voicebanks, we will re-format her voice downloads section. At that time, we’ll sort voices by language rather than by voicebank name. Furthermore, we will leave it as is until the full IGNITE release (projected late 2022 or early 2023, we underestimated this undertaking!). We will be tackling the pages for HONOS, AXIS, APOLLO, THEIA, and ATLAS in the coming weeks.
Firstly, we have discontinued “Original”, replaced with “Original V2”. Note: if you have her Original voicebank downloaded, we ask that you do not redistribute it!
Additionally, we’ve updated Original V2, AMORE, SALIENT, and IGNITE (Alpha) for OpenUTAU compatibility.
Updated Original and TELLURIC for OpenUTAU compatibility
To clarify, we’ve made TELLURIC OTO updates. Changed Prefixes to Suffixes. Must download if you are planning to use her in OpenUTAU. Otherwise, her Falsetto Voice Color will not function properly. If you do not use OpenUTAU, you do not need to worry about this!
In addition to this, we’ve updated “Original” to 1.5.0. Furthermore, we swapped around some defaults for better voice control. AXIS TELLURIC’s B3 is now the base voice. The old “Original” has become “Raspy”. “Lively” has become the new “Original”. This will serve as a placeholder until Original V2 is released.
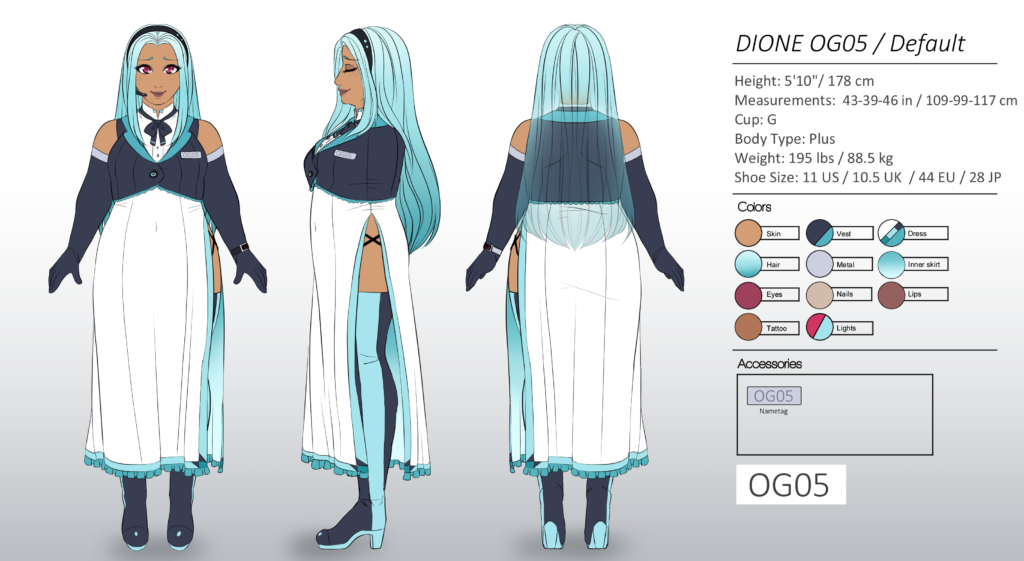
Today, we’ll be going over our plans for the release of our newest OGIENOID; DIONE OG05. Included in this briefing will also be her voicebank details, range, and a few extras. As of today, her page has been updated once again to reveal more downloadable content on her character page. Let’s get started!
DIONE OG05’s Slated Release
If you’ve followed our TikTok account, you may already know we are teasing a May 2022 release. We are currently slating the official release for the end of the month, May 31st. This is actually a Tuesday, so her release will be combined with our end-of-the-month progress report for May. We want DIONE OG05 out as soon as possible, but we want to give ourselves ample time. We’re working to find the rest of her bugs, finalize her OTO and properly edit her documentation.
For the first time, we have changed the formula for Original/Default voicebanks! We’ve made the executive decision to release new characters as a single timbre. This is to keep up with our more complex releases like KASAI SALIENT and the Goddess series. However, these single appends will be multipitch, with four unique pitches. Going forward, this will be our new formula. The goal is to allow newer OGIENOIDs to show their true potential and range from the beginning, keep their voices relevant for longer, and reduce the number of recordings needed for future expansions. This way, we can create better quality voices and deliver updates to our audience faster than ever before.
DIONE OG05’s Initial Release And Specs
DIONE OG05 Default is a Japanese VCV that will include four unique pitches: C3, F3, A#3,D#4. This will actually make DIONE OG05 the OGIENOID in our lineup with the lowest range (yes, even lower than HONOS OG04!). Her voice is recorded in a calm, gentle tone, making her an ideal fit for ballads, soft pop, and other similar genres.
Her release will include a folder compatible with both UTAU and OpenUTAU. Extra files included are her full body artwork, reference image, and logo.
Most Recent Teasers
At this time, we have one short teaser out for DIONE OG05. New full length demos will begin to come out later this month!
After many years, STUDIO OGIEN has finally obtained an updated recording setup for its UTAU characters! We are excited to bring more OGIENOID voices to life with our new UTAU recording setup!
To clarify before we begin, we understand that some of the items we use in this list are a bit on the pricey end. However, we have spent many months saving money and taking advantage of payment plans to buy these pieces of equipment. We chose to invest in equipment with long-term usability.This way, we can create voicebanks with consistent quality for years to come.The following post acts as a record of our current equipment. Our hope is that this post can help our audience.
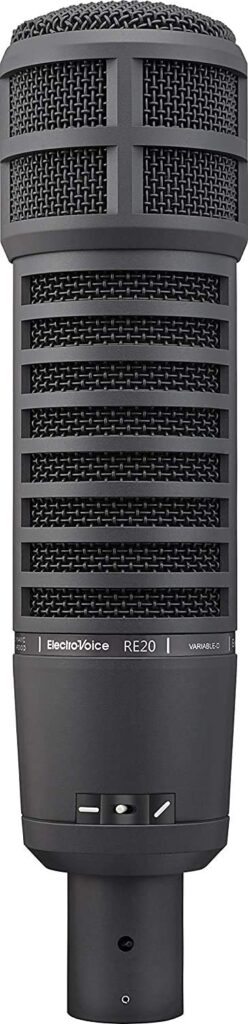
Firstly, let’s begin with the item we are most excited about. The Electro-Voice RE20 is a microphone that has been a fan favorite for radio since 1968. It is STUDIO OGIEN’s first XLR microphone! We chose this mic for its true cardioid nature and smooth sound. Additionally, the RE20 is excellent for reducing background noise as well.
An XLR is different than a standard USB mic. Unlike a USB mic, an XLR mic does not plug straight into your computer. To sum up, XLR mics need more parts in order to work.
It is a pricier microphone, but it is easy to finance this mic with a payment plan.
Secondly, our new mic stand. This heavy-duty piece of gear is solid, sturdy, and heavy. This is great, as our setup demands a lot out of a mic stand! For the quality, it is a fairly priced piece. The included screw adapter also fits the RE20 perfectly.
In addition, we added an isolation shield to our setup. Isolation shields reduce the noise picked up via the microphone while recording. In short, by isolating your microphone from its surrounding environment, the shield enhances the quality of your voice and prevents distortions. For example, we use this shield to prevent unwanted noise from leaking into our recordings from less insulated walls.
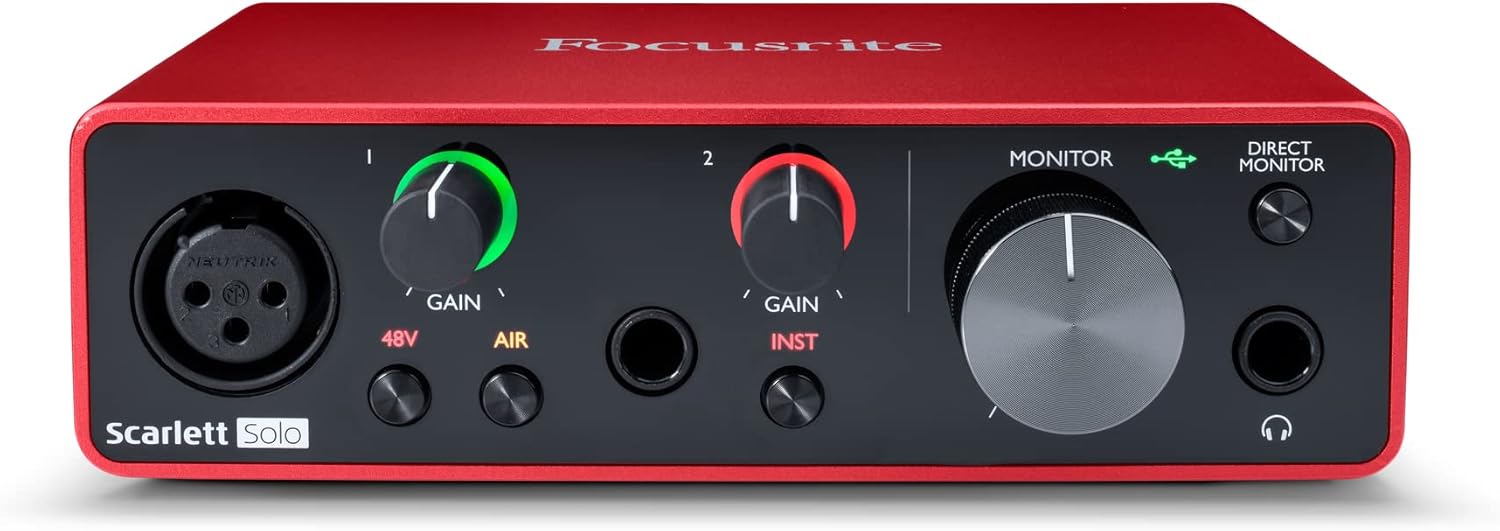
Further, we required a way to make our mic “talk” to our computer. In comes our audio interface. An audio interface is a tool that converts signals into a format your computer can recognize. The interface can also play audio directly to your headphones. We decided to go with the Focusrite Scarlett Solo for its ability to capture studio-like quality without the full studio! Another plus we love with this interface is the ease of use. On days we want to get to recording as soon as possible – it’s as easy as 1, 2, 3!
XLR cables are the proper way to connect your audio interface and mic. In short, these cables act as a connector between various stage, audio, and video pieces of equipment. The connectors are circular in design and have between three and seven pins.
What About A Preamp/Mic Activator?
If you’ve been doing your research on a recording set-up, you may have heard the term “preamp”. To sum up, a preamp is a device that connects to your audio interface and microphone to help counter the inevitable noise the microphone will pick up. However, the microphone we have chosen for our newest set-up is one that has a built-in noise-canceling filter. This helps the microphone pick up your voice only.
During our initial testing, we discovered an odd issue with the RE-20 producing a high amount of background noise. Once we removed the preamp from the equation, we noticed an uptick in quality. After that, we concluded that the preamp was causing our samples to have a heavy amount of “engine noise”. We discovered that the cloudlifter was interfering with the RE-20’s built-in noise cancellation. As a result, we eventually excluded it from our setup.
Originally, we selected the Cloudlifter CL-1 Mic Activator. It did not fit our needs, but depending on the microphone you choose, this may be a great addition to your own setup.
Our original equipment began with a Logitech headset, and from there we quickly upgraded to a Blue Yeti. A decent USB mic, it served as a great starting point. Our Blue Yeti was used to record all currently released OGIENOID voicebanks (excluding HONOS OG04). In the end, we sold our Blue Yeti to finance the purchase of new equipment, so, going forward, no new OGIENOID voicebanks will use that mic.
Below is a breakdown of each OGIENOID and the equipment used for their recordings.
DIONE OG05 Original [VCV] -(Currently in development, initial recordings completed) – Our new equipment. Currently being recorded in an open room with light sound treatment.
Though the UTAU software was initially designed to process CV voicebanks, the UTAU community, over time, began to experiment and construct new recording methods. One such technique that developed was referred to as “triphones”, “triphonics”, or 連続音 ( renzokuon ). The approach would later be popularly referred to as VCV, or “Vowel-Consonant-Vowel”. VCV was the second major recording method created by the UTAU community, and it soon became one of the most popular and widely adopted. It is commonly associated with multipitch voicebanks (a UTAU recorded with multiple voicebanks at multiple pitches) to obtain even greater realism.
A triphone or triphonic is a sound consisting of three basic phonemes. Phonemes are a distinct unit of sound used in language, such as “k” “d” “p”. VCV utilizes triphones to create a smoother, more lifelike vocal than CV by “stringing” three phonemes together. So, within VCV, a triphone would look something like “a ka”. So long as the voicebank has a high-quality OTO, UTAU will blend together the starting and ending vowels of one note into the next, creating a fluid voice.
Numerous members of the community will argue for and against VCV’s ease of use. Many claim recording and configuring VCV is more difficult and time-consuming than VCV, but that it is more straightforward to utilize and, ultimately, procures a better sound.
Using VCV
Let’s learn how to use VCV in UTAU! First, load up the desired Voicebank and UST file (if you have one). There are two scenarios here: the UST is either formatted for VCV or it just isn’t. Not every UST comes in VCV format, but you may really, really want to use the UST. Fear not, there are many options to remedy this situation!
The tedious method that we aren’t going to actually consider a method, but rather a painful last resort: Add the preceding vowel to the lyric: Let’s say you have two notes “か” (ka) and “あ” (a). Simply add an “a” in the same note as あ. Simply, あ now becomes “a あ”.
The easiest method (that, unfortunately, costs money): UTAU Shareware: If you have the shareware version of UTAU, you can simply hit the auto VCV button, and UTAU will turn the vowels into VCV!
Click “A” for auto VCV
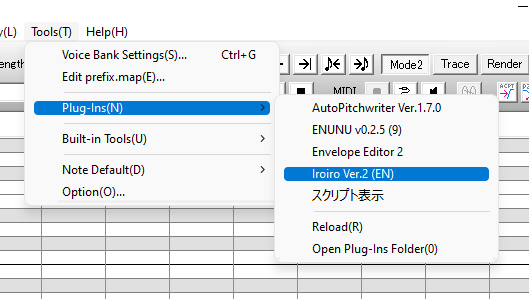
Other methods:Plugins: Some plugins may convert the CV vowels into VCV without altering the rest. Others may turn the entire UST into VCV. Experimentation is key! IroIro is our favorite recommendation, as the plugin has many other useful features packed into it as well.
Navigating to your installed UTAU plugins
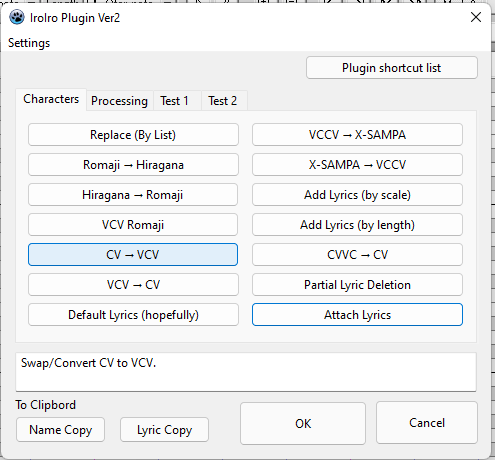
If you have IroIro Installed, follow Tools > Plug-Ins(N) > IroIro. Select CV -> VCV and click OK.
IroIro’s many options
Once your UST is in VCV format, you are ready to proceed.
Fitting a UST to a VCV Voicebank
Fitting a UST file to a UTAU Voicebank will definitely improve the sound and make your covers appear more professional. By fitting the UST, you are telling the software to conform to that particular UTAU’s configurations and setup (OTO). This is an important step if the UST was not explicitly made for the UTAU you are using, and it helps to improve the fluidity and clarity of the voice. So, let’s do it!
To start:
Open a UST file
Select all (Ctrl+A)
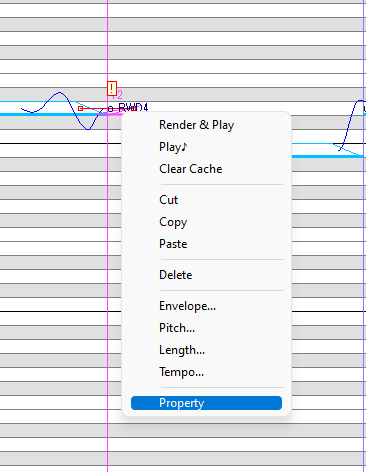
Right-click on a note
On the pop-up, select “Property” or “Region Property” (if you selected all notes). A new window will appear.
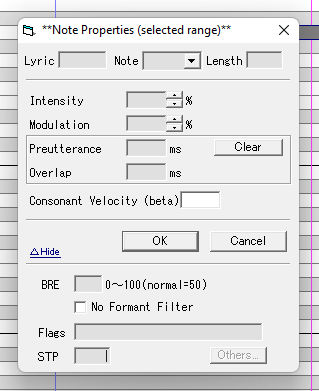
You may notice sections on this window labeled “Preutterance” and “Overlap”. To their right, there is a “Clear” button. We want to click that.
Next, at the bottom of the window, there is a box labeled STP.
If it has a value, delete it.
If the box is grayed out, double-click the box to clear it.
Press “OK”
In the top right of the main window of UTAU, you will see a group of four buttons (ACPT, P2P3, P1P4, RESET).
Click RESET
Then click P2P3
Next, P1P4
P2P3 again
Click ACPT (You can click this multiple times if you see any red “!”, and it may take care of those. More on that in just a second!)
That’s it! You’ve fit the UST to your VCV Voicebank
Special Characters, Envelope Issues and Other Problem Samples
Special Characters
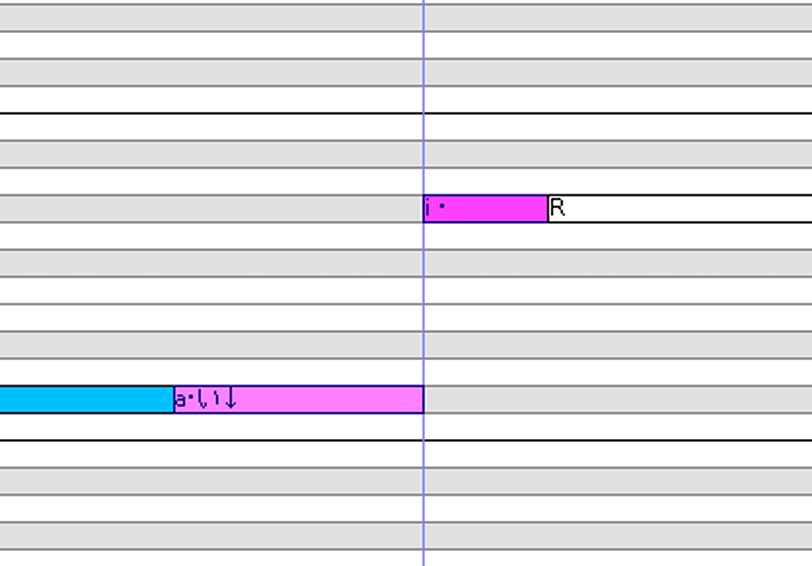
Example of notes with special characters
While fitting a UST to your UTAU, you may find errors highlighted as red “!” along the way. VCV is a popular method and widely employed, so a user may run across custom notes, properties, and expressions within a UST. Your UTAU may not have these special notes and sounds, so, we need to run through a few options.
Manual removal
Simply edit each note, one by one, and delete the extra symbols.
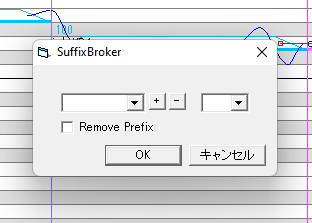
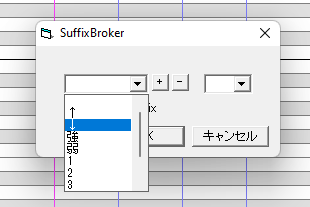
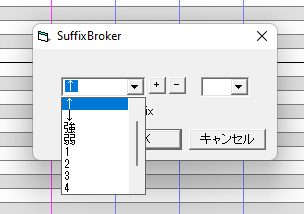
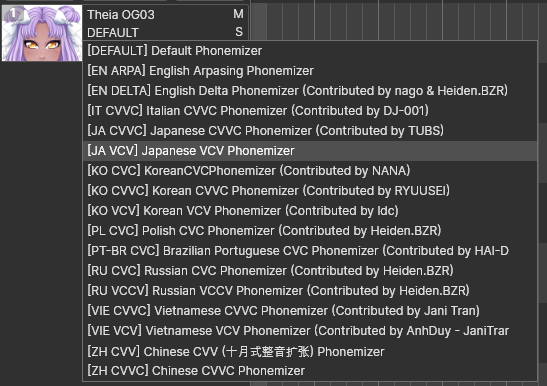
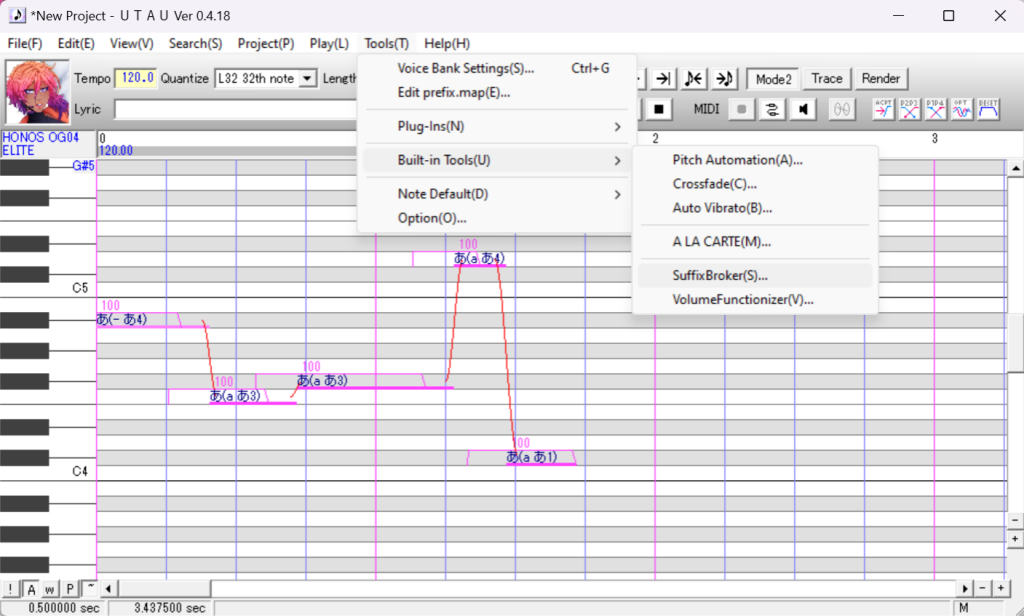
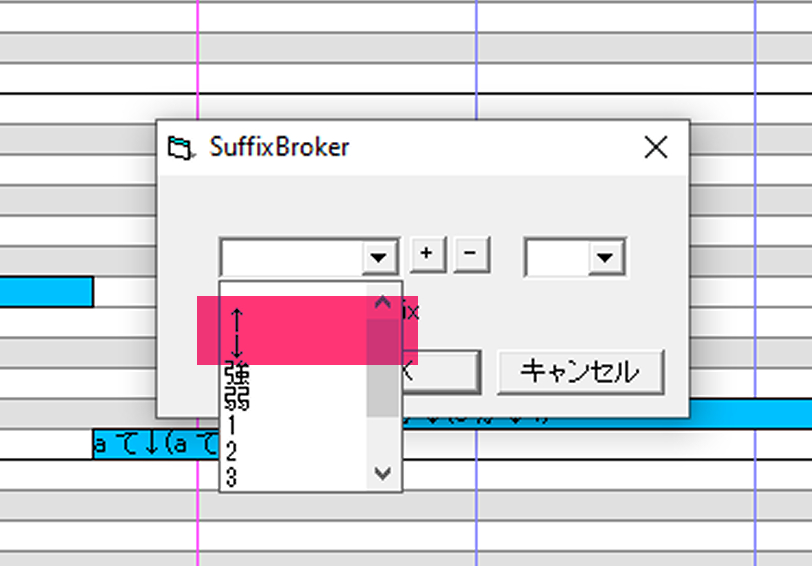
SuffixBroker (for custom characters at the end of a note such as an up or down arrow, a number, or another special symbol)
Select the notes you want the characters removed from
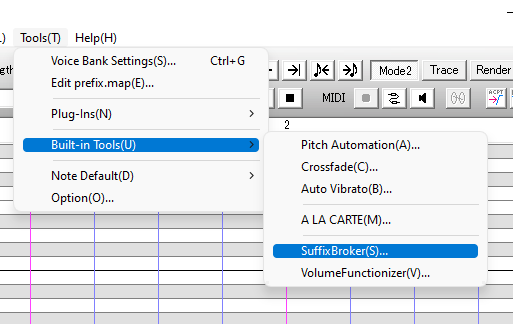
Found under: Tools > Built-in Tools > SuffixBroker
Leave the box blank, click OK, and now the Suffixes are gone! PLEASE NOTE: this does not always perform 100%. Make sure to double-check your work.
Third-Party Plugins
Example of notes with special characters removed
Much better!
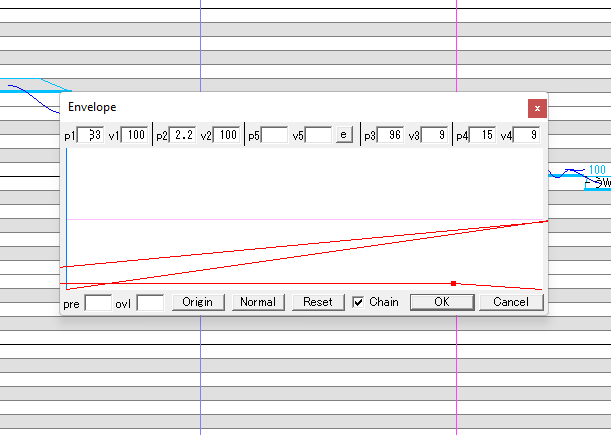
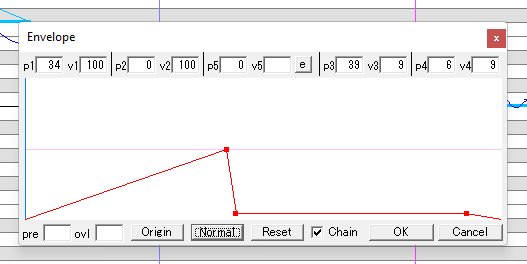
Envelope Issues
The error still shows up, and, more confusingly, the sound sample exists and your oto is fine. Grr… Now that’s frustrating! But we have a fix. Let’s check and edit some envelopes!
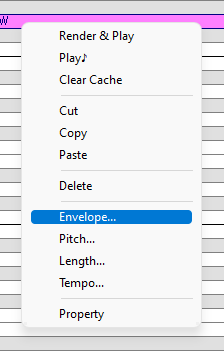
Very carefully, right-click on the note. A new pop-up will appear. Hover down to “Envelope…” and click on it.
And…
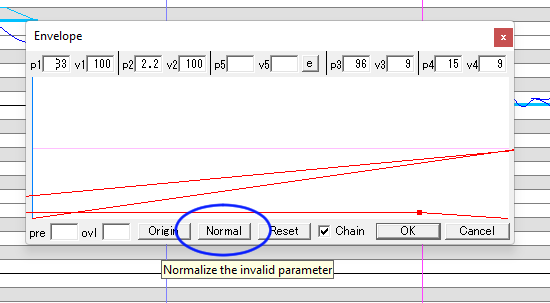
YIKES! That’s pretty bad! Worry not, there’s a simple fix. Let’s click “Normal”. 9/10 times, that does the job.
If the error still persists after hitting “Normal”, simply drag the red boxes around until they look, well, normal. Click OK and it should be good to go!
Much better, and now our “!” is gone. We are ready to tune and mix!
Other Problems
Some users may experience odd glitches. If you play the track back and notice slurring happening, you may want to change what notes you select. In our experience, selecting only the notes tends to help. Sometimes, hitting Ctrl+A selects rests and other unique settings that cause the fit to mess up. Click the first note of the vocal track, and then scroll to the end. Select the last note by holding down Shift, then left-click the lyric. Fit the UST again, and it should work!
Conclusion
Today, we’ve covered quite a bit about how to use VCV UTAU Voicebanks! With these tools, you should be ready to dive right in. We hope this resource has been a big help.
Need more assistance with UTAU and creating your very own voicebank? STUDIO OGIEN has compiled resources to use with the UTAU software. Check it out here! If you can’t find what you’re looking for, please let us know through our contact form or leave a comment on this article. We can’t wait to see what you create!
ATLAS OG07 “Celestial” is a 7-pitch Japanese VCV style Voicebank developed by STUDIO OGIEN. Released in 2015, “Celestial” is the second addition to The Goddess Series, a mini-series of voicebank releases based on the OGIENOIDs’ alter-egos in another world.
How To Use ATLAS OG07 Celestial
Using Multi-pitch
“Celestial” consists of 7 unique pitches that are auto-configured using the Prefix.map function in UTAU. As long as the user does not remove the Prefix.map file, the multi-pitch functions of Celestial will work without any additional effort. From this point, a user can carry on as if they are using a normal VCV voicebank.
For those new to the VCV voicebank format, let’s learn how to use it in UTAU! First, load up the desired Voicebank and UST file (if you have one). There are two scenarios here: the UST is either formatted for VCV or it just isn’t. Not every UST comes in VCV format, but you may really, really want to use the UST. Fear not, there are many options to remedy this situation!
The tedious method that we aren’t going to actually consider a method, but rather a painful last resort: Add the preceding vowel to the lyric: Let’s say you have two notes “か” (ka) and “あ” (a). Simply add an “a” in the same note as あ. Simply, あ now becomes “a あ”.
The easiest method (that, unfortunately, costs money): UTAU Shareware: If you have the shareware version of UTAU, you can simply hit the auto VCV button, and UTAU will turn the vowels into VCV!
Click “A” for auto VCV
Other methods: Plugins: Some plugins may convert the CV vowels into VCV without altering the rest. Others may turn the entire UST into VCV. Experimentation is key! IroIro is our favorite recommendation, as the plugin has many other useful features packed into it as well.
Navigating to your installed UTAU plugins
If you have IroIro Installed, follow Tools > Plug-Ins(N) > IroIro. Select CV -> VCV and click OK.
IroIro’s many options
Once your UST is in VCV format, you are ready to proceed.
Fitting a UST to a VCV Voicebank
Fitting a UST file to a UTAU Voicebank will definitely improve the sound and make your covers appear more professional. By fitting the UST, you are telling the software to conform to that particular UTAU’s configurations and setup (OTO). This is an important step if the UST was not explicitly made for the UTAU you are using, and it helps to improve the fluidity and clarity of the voice. So, let’s do it!
To start:
Open a UST file
Select all (Ctrl+A)
Right-click on a note
On the pop-up, select “Property” or “Region Property” (if you selected all notes). A new window will appear.
You may notice sections on this window labeled “Preutterance” and “Overlap”. To their right, there is a “Clear” button. We want to click that.
Next, at the bottom of the window, there is a box labeled STP.
If it has a value, delete it.
If the box is grayed out, double-click the box to clear it.
Press “OK”
In the top right of the main window of UTAU, you will see a group of four buttons (ACPT, P2P3, P1P4, RESET).
Click RESET
Then click P2P3
Next, P1P4
P2P3 again
Click ACPT (You can click this multiple times if you see any red “!”, and it may take care of those. More on that in just a second!)
That’s it! You’ve fit the UST to your VCV Voicebank
Special Characters, Envelope Issues, and Other Problem Samples
Special Characters
Example of notes with special characters
While fitting a UST to your UTAU, you may find errors highlighted as red “!” along the way. VCV is a popular method and widely employed, so a user may run across custom notes, properties, and expressions within a UST. Your UTAU may not have these special notes and sounds, so, we need to run through a few options.
Manual removal
Simply edit each note, one by one, and delete the extra symbols.
SuffixBroker (for custom characters at the end of a note such as an up or down arrow, a number, or another special symbol)
Select the notes you want the characters removed from
Found under: Tools > Built-in Tools > SuffixBroker
Leave the box blank, click OK, and now the Suffixes are gone! PLEASE NOTE: this does not always perform 100%. Make sure to double-check your work.
Third-Party Plugins
Much better!
Envelope Issues
The error still shows up, and, more confusingly, the sound sample exists and your oto is fine. Grr… Now that’s frustrating! But we have a fix. Let’s check and edit some envelopes!
Very carefully, right-click on the note. A new pop-up will appear. Hover down to “Envelope…” and click on it.
And…
YIKES! That’s pretty bad! Worry not, there’s a simple fix. Let’s click “Normal”. 9/10 times, that does the job.
If the error still persists after hitting “Normal”, simply drag the red boxes around until they look, well, normal. Click OK and it should be good to go!
Much better, and now our “!” is gone. We are ready to tune and mix!
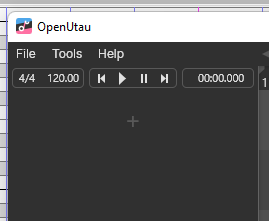
For tracks made from scratch, start by clicking the “+” icon on the left-hand side. A new track like so will be created.
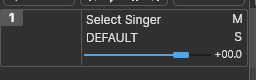
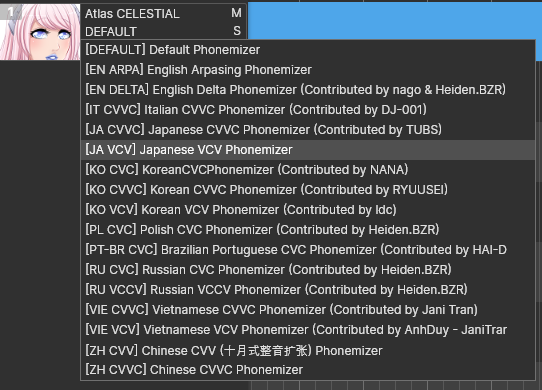
Click on “Select Singer” and choose a voice. In this instance, we will choose Atlas CELESTIAL.
The voice is loaded. Now, we must tell OpenUTAU what type of voicebank she has. Click on “DEFAULT” to open a new menu of options.
Select “[JP VCV] Japanese VCV Phonemizer”. We are ready to use VCV in OpenUTAU!
For Existing USTs:
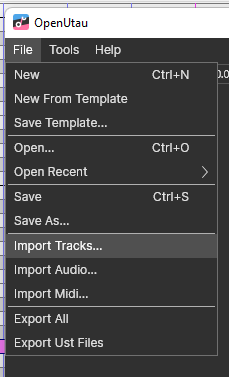
Go to “File > Import Tracks…” and choose a UST of your liking.
You may notice the singer data is saved from the UST file. You may or may not have this UTAU in your library. Either way, we are wanting to use Atlas CELESTIAL in this example as well. Go ahead and click on the singer’s name to open a new menu.
Select the preferred singer by clicking their name. In this instance, we will choose Atlas CELESTIAL.
The voice is loaded. Now, we must tell OpenUTAU what type of voicebank she has. Click on “DEFAULT” to open a new menu of options.
Select “[JP VCV] Japanese VCV Phonemizer”. We are ready to use VCV in OpenUTAU!
ATLAS OG07 “Original” is a Japanese VCV style Voicebank developed by STUDIO OGIEN. Released in 2018, she is the first member of the OGIENOID character subset collectively known as “The Triad,” her counterparts being HONOS OG04 and VIRTUS OG02. Her voice suits pop, rock, and EDM genres with a broad range of expressions, among other music types. Currently, she is the OGIENOID with the largest selection of Monopitch appends.
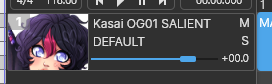
ATLAS OG07’s “Original” voicebank is an assortment of four different VCVs, each in a unique timbre (the character or quality of a musical sound or voice as distinct from its pitch and intensity). “Original” is a normal singing voice, Lullaby (a soft voice), and Endure (a powerful voice). This voicebank combines three voicebanks into one, allowing the user to plug in “↑” or “↓” into the UST from the SuffixBroker for appends. Making all voices available to use in one UST helps make editing, tuning, and mixing faster and easier.
Using ATLAS OG07 Original
Using The Included Appends
ORIGINAL
“Original” is ATLAS OG07’s default voice and will play so long as the user understands how to control VCV UTAU voicebanks. No additional steps are necessary to utilize this tone.
LULLABY
Select or enter “↓” into the UST from the SuffixBroker. By default, it should be included in the base installation of UTAU.
ENDURE
Select or enter “↑” into the UST from the SuffixBroker. By default, it should be included in the base installation of UTAU.
For those new to the VCV voicebank format, let’s learn how to use it in UTAU! Firstly, load up the desired Voicebank and UST file (if you have one). There are two scenarios here: the UST is either formatted for VCV or it just isn’t. Not every UST comes in VCV format, but you may really, really want to use the UST. However, there are many options to remedy this situation!
The tedious method that we aren’t going to actually consider a method, but rather a painful last resort: Add the preceding vowel to the lyric: Let’s say you have two notes “か” (ka) and “あ” (a). Simply add an “a” in the same note as あ. Simply, あ now becomes “a あ”.
The easiest method (that, unfortunately, costs money): UTAU Shareware: If you have the shareware version of UTAU, you can simply hit the auto VCV button, and UTAU will turn the vowels into VCV!
Click “A” for auto VCV
Other methods:
Plugins: Some plugins may convert the CV vowels into VCV without altering the rest. Others may turn the entire UST into VCV. Experimentation is key! IroIro is our favorite recommendation, as the plugin has many other useful features packed into it as well.
Next, if you have IroIro Installed, follow Tools > Plug-Ins(N) > IroIro. Select CV -> VCV and click OK.
IroIro’s many options
Once your UST is in VCV format, you are ready to proceed.
Fitting a UST to a VCV Voicebank
Above all, fitting a UST file to a UTAU Voicebank will improve the sound and make your covers appear more professional. In other words, this is perhaps the most important step in the mixing process! By fitting the UST, you are telling the software to conform to that particular UTAU’s configurations and setup (OTO). This is an important step if the UST was not explicitly made for the UTAU you are using, and it helps to improve the fluidity and clarity of the voice. So, let’s do it!
To start:
Open a UST file
Select all (Ctrl+A)
Right-click on a note
On the pop-up, select “Property” or “Region Property” (if you selected all notes). A new window will appear.
You may notice sections on this window labeled “Preutterance” and “Overlap”. To their right, there is a “Clear” button. We want to click that.
Next, at the bottom of the window, there is a box labeled STP.
If it has a value, delete it.
If the box is grayed out, double-click the box to clear it.
Press “OK”
In the top right of the main window of UTAU, you will see a group of four buttons (ACPT, P2P3, P1P4, RESET).
Click RESET
Then click P2P3
Next, P1P4
P2P3 again
Click ACPT (You can click this multiple times if you see any red “!”, and it may take care of those. More on that in just a second!)
That’s it! You’ve fit the UST to your VCV Voicebank
Special Characters, Envelope Issues and Other Problem Samples
Special Characters
Example of notes with special characters
While fitting a UST to your UTAU, you may find errors highlighted as red “!” along the way. VCV is a popular method and widely employed, so a user may run across custom notes, properties, and expressions within a UST. Your UTAU may not have these special notes and sounds, so, we need to run through a few options.
Manual removal
Simply edit each note, one by one, and delete the extra symbols.
SuffixBroker (for custom characters at the end of a note such as an up or down arrow, a number, or another special symbol)
Select the notes you want the characters removed from
Found under: Tools > Built-in Tools > SuffixBroker
Leave the box blank, click OK, and now the Suffixes are gone! However, sometimes this may not do exactly what you’re hoping. To clarify, this does not always perform 100%, and there are times it may actually remove the latter half of the VCV note. Make sure to double-check your work!
Third-Party Plugins
Much better!
Envelope Issues
The error still shows up, and, more confusingly, the sound sample exists and your oto is fine. Grr… Now that’s frustrating! But we have a fix. Let’s check and edit some envelopes!
Very carefully, right-click on the note. A new pop-up will appear afterward. Hover down to “Envelope…” and click on it.
And…
YIKES! That’s pretty bad! Worry not, there’s a simple fix. Let’s click “Normal”. 9/10 times, that does the job.
If the error still persists after hitting “Normal”, simply drag the red boxes around until they look, well, normal. After that, click OK and it should be good to go!
Much better, and now our “!” is gone. We are ready to tune and mix!
For tracks made from scratch, start by clicking the “+” icon on the left-hand side. A new track like so will be created.
After that, click on “Select Singer” and choose a voice. In this instance, we will choose Atlas OG07.
The voice is loaded. Now, we must tell OpenUTAU what type of voicebank she has. Click on “DEFAULT” to open a new menu of options.
Select “[JP VCV] Japanese VCV Phonemizer”. Finally, we are ready to use VCV in OpenUTAU!
For Existing USTs:
Navigate to “File > Import Tracks…” and choose a UST of your liking.
You may notice the singer data is saved from the UST file. You may or may not have this UTAU in your library. Either way, we are wanting to use Atlas OG07 in this example as well. Go ahead and click on the singer’s name to open a new menu.
Select the preferred singer by clicking their name. In this instance, we will choose Atlas OG07.
The voice is loaded. Now, we must tell OpenUTAU what type of voicebank she has. Click on “DEFAULT” to open a new menu of options.
Select “[JP VCV] Japanese VCV Phonemizer”. Finally, we are ready to use VCV in OpenUTAU!
THEIA OG03 “Original” is a Japanese VCV style Voicebank developed by STUDIO OGIEN. Released in 2018, she is the first member of the OGIENOID character subset collectively known as “The Triad,” her counterparts being HONOS OG04 and VIRTUS OG02. Her voice suits pop, rock, and EDM genres with a broad range of expressions, among other music types. Currently, she is the OGIENOID with the largest selection of Monopitch appends.
THEIA OG03’s “Original” voicebank is an assortment of four different VCVs, each in a unique timbre (the character or quality of a musical sound or voice as distinct from its pitch and intensity). “Original” is a normal singing voice, Flutter (a soft voice), Swarm (a powerful voice), and Swarm_alternate (a different take on Swarm that is slightly more powerful). This voicebank combines four voicebanks into one, allowing the user to plug in “↑”, “↓”, or “S” into the UST from the SuffixBroker for appends. Making all voices available to use in one UST helps make editing, tuning, and mixing faster and easier.
Using THEIA OG03 Original
Using The Included Appends
ORIGINAL
“Original” is THEIA OG03’s default voice and will play so long as the user understands how to control VCV UTAU voicebanks. No additional steps are necessary to utilize this tone.
FLUTTER
Select or enter “↓” into the UST from the SuffixBroker. By default, it should be included in the base installation of UTAU.
SWARM
Select or enter “↑” into the UST from the SuffixBroker. By default, it should be included in the base installation of UTAU.
For those new to the VCV voicebank format, let’s learn how to use it in UTAU! Firstly, load up the desired Voicebank and UST file (if you have one). There are two scenarios here: the UST is either formatted for VCV or it just isn’t. Not every UST comes in VCV format, but you may really, really want to use the UST. However, there are many options to remedy this situation!
The tedious method that we aren’t going to actually consider a method, but rather a painful last resort: Add the preceding vowel to the lyric: Let’s say you have two notes “か” (ka) and “あ” (a). Simply add an “a” in the same note as あ. Simply, あ now becomes “a あ”.
The easiest method (that, unfortunately, costs money): UTAU Shareware: If you have the shareware version of UTAU, you can simply hit the auto VCV button, and UTAU will turn the vowels into VCV!
Click “A” for auto VCV
Other methods:
Plugins: Some plugins may convert the CV vowels into VCV without altering the rest. Others may turn the entire UST into VCV. Experimentation is key! IroIro is our favorite recommendation, as the plugin has many other useful features packed into it as well.
Next, if you have IroIro Installed, follow Tools > Plug-Ins(N) > IroIro. Select CV -> VCV and click OK.
IroIro’s many options
Once your UST is in VCV format, you are ready to proceed.
Fitting a UST to a VCV Voicebank
Above all, fitting a UST file to a UTAU Voicebank will improve the sound and make your covers appear more professional. In other words, this is perhaps the most important step in the mixing process! By fitting the UST, you are telling the software to conform to that particular UTAU’s configurations and setup (OTO). This is an important step if the UST was not explicitly made for the UTAU you are using, and it helps to improve the fluidity and clarity of the voice. So, let’s do it!
To start:
Open a UST file
Select all (Ctrl+A)
Right-click on a note
On the pop-up, select “Property” or “Region Property” (if you selected all notes). A new window will appear.
You may notice sections on this window labeled “Preutterance” and “Overlap”. To their right, there is a “Clear” button. We want to click that.
Next, at the bottom of the window, there is a box labeled STP.
If it has a value, delete it.
If the box is grayed out, double-click the box to clear it.
Press “OK”
In the top right of the main window of UTAU, you will see a group of four buttons (ACPT, P2P3, P1P4, RESET).
Click RESET
Then click P2P3
Next, P1P4
P2P3 again
Click ACPT (You can click this multiple times if you see any red “!”, and it may take care of those. More on that in just a second!)
That’s it! You’ve fit the UST to your VCV Voicebank
Special Characters, Envelope Issues and Other Problem Samples
Special Characters
Example of notes with special characters
While fitting a UST to your UTAU, you may find errors highlighted as red “!” along the way. VCV is a popular method and widely employed, so a user may run across custom notes, properties, and expressions within a UST. Your UTAU may not have these special notes and sounds, so, we need to run through a few options.
Manual removal
Simply edit each note, one by one, and delete the extra symbols.
SuffixBroker (for custom characters at the end of a note such as an up or down arrow, a number, or another special symbol)
Select the notes you want the characters removed from
Found under: Tools > Built-in Tools > SuffixBroker
Leave the box blank, click OK, and now the Suffixes are gone! However, sometimes this may not do exactly what you’re hoping. To clarify, this does not always perform 100%, and there are times it may actually remove the latter half of the VCV note. Make sure to double-check your work!
Third-Party Plugins
Much better!
Envelope Issues
The error still shows up, and, more confusingly, the sound sample exists and your oto is fine. Grr… Now that’s frustrating! But we have a fix. Let’s check and edit some envelopes!
Very carefully, right-click on the note. A new pop-up will appear afterward. Hover down to “Envelope…” and click on it.
And…
YIKES! That’s pretty bad! Worry not, there’s a simple fix. Let’s click “Normal”. 9/10 times, that does the job.
If the error still persists after hitting “Normal”, simply drag the red boxes around until they look, well, normal. After that, click OK and it should be good to go!
Much better, and now our “!” is gone. We are ready to tune and mix!
For tracks made from scratch, start by clicking the “+” icon on the left-hand side. A new track like so will be created.
After that, click on “Select Singer” and choose a voice. In this instance, we will choose Theia OG03.
The voice is loaded. Now, we must tell OpenUTAU what type of voicebank she has. Click on “DEFAULT” to open a new menu of options.
Select “[JP VCV] Japanese VCV Phonemizer”. Finally, we are ready to use VCV in OpenUTAU!
For Existing USTs:
Navigate to “File > Import Tracks…” and choose a UST of your liking.
You may notice the singer data is saved from the UST file. You may or may not have this UTAU in your library. Either way, we are wanting to use Theia OG03 in this example as well. Go ahead and click on the singer’s name to open a new menu.
Select the preferred singer by clicking their name. In this instance, we will choose Theia OG03.
The voice is loaded. Now, we must tell OpenUTAU what type of voicebank she has. Click on “DEFAULT” to open a new menu of options.
Select “[JP VCV] Japanese VCV Phonemizer”. Finally, we are ready to use VCV in OpenUTAU!
Official release notice and tutorial for THEIA OG03: MONARCH!
About The Voicebank:
The official release of the new THEIA OG03 voicebank is finally here!THEIA OG03 MONARCH is an all-in-one Japanese VCV Voicebank that possesses both Multi-pitch and Multi-expression voices.
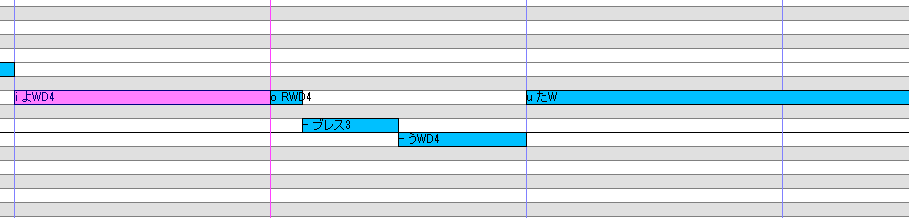
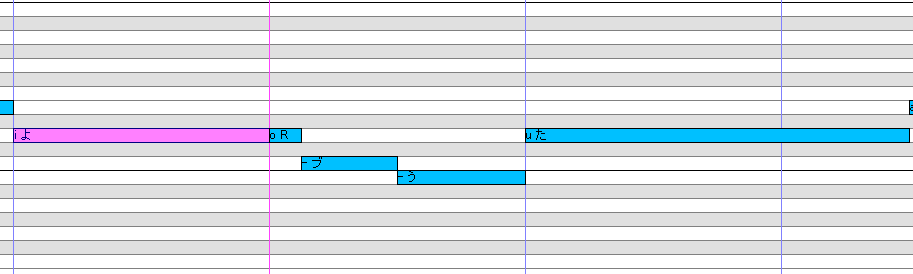
This Voicebank has three timbres that are 4 pitches each (Contralto, F3~A4), making MONARCH a total of 12 VCVs. The three timbres can be used all in one track by utilizing the SuffixBroker. MONARCH’s three expressions are:
“Chrysallis”: Normal voice
“Iridescent”: Gentle/soft voice
“Ultraviolet”: Solid/power voice
THEIA OG03 MONARCH also has some fun add-ons, including several breaths (intake and outtake), western L notes (all timbres, all pitches), two Growl CV banks (Mono-pitch, one higher register and one lower), Vocal Fry (sounds best used with Chrysallis/Iridescent, 4 pitch), and Glottal Stops (all timbres, all pitches).
USING MONARCH: APPENDS
Chrysallis – Normal tone of voice. No extra effort is required to use Chrysallis.
Iridescent – A soft/whisper bank. You can use it by selecting the “↓” symbol in the SuffixBroker in UTAU. For OpenUTAU, please use Voice Colors in the editor (under CLR).
Ultraviolet – A solid/power bank. You can use it by selecting the “↑” symbol in the SuffixBroker in UTAU. For OpenUTAU, please use Voice Colors in the editor (under CLR).
Using the SuffixBrokerUsing Voice Colors in OpenUTAU
Glottal Stopswith the MONARCH Voicebank:
Glottal stops are compatible with all three appends in MONARCH.
– Replace the space between letters with the・ symbol (ex: turn a あ into a・あ).
– Ends notes use ・ at the end (ex: a ・)
Using Glottal Stops
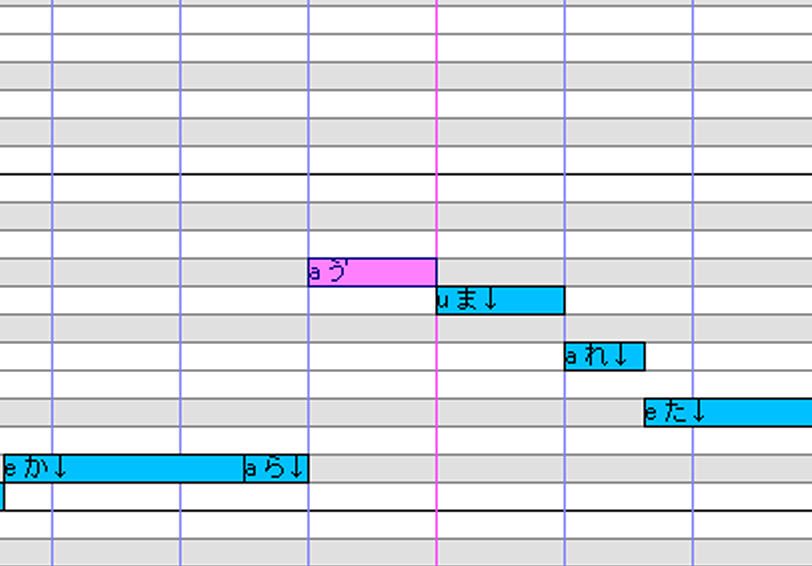
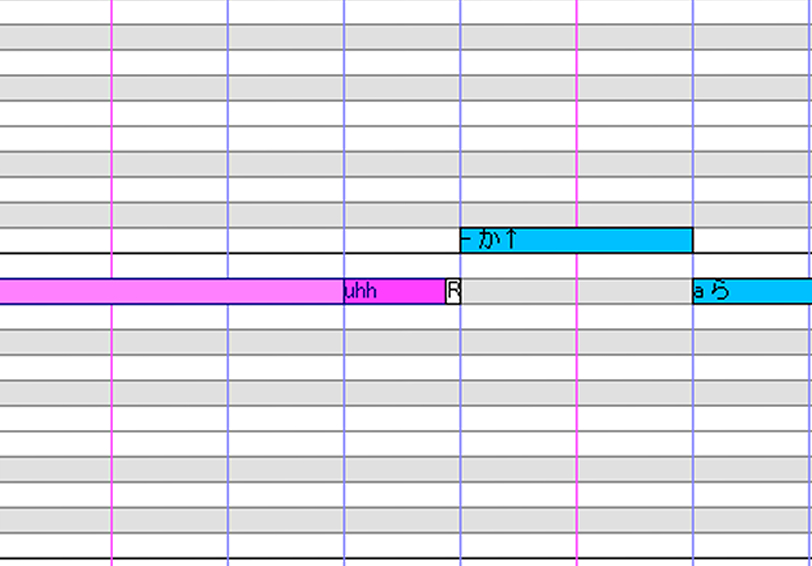
Vocal Fry & Breaths with the MONARCH Voicebank:
Vocal fry: Use ‘ as the suffix (ex: – あ’ or あ’) or prefix (‘あ). Drop-off end notes are formatted with – (ex: a -)
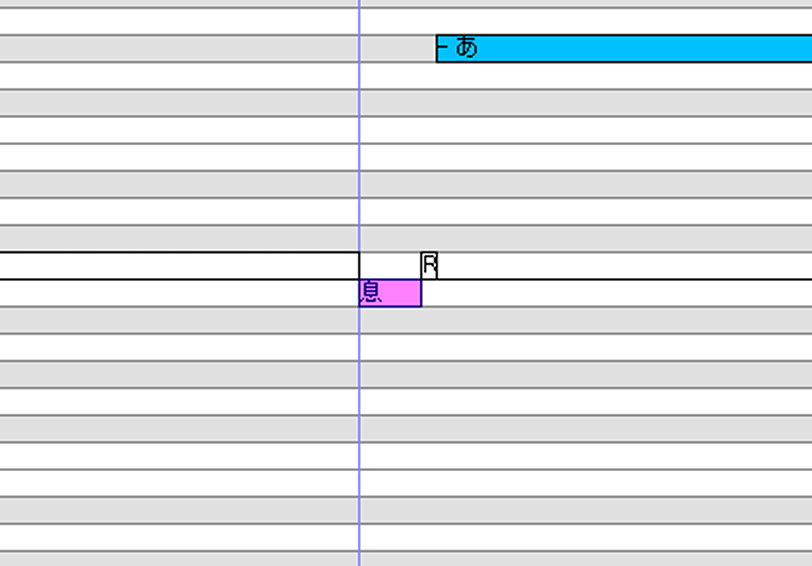
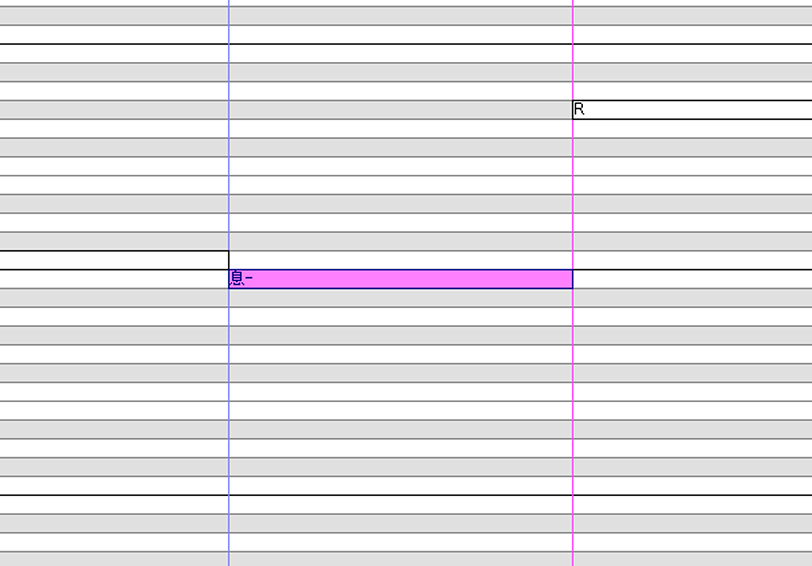
Breaths: MONARCH possesses an entire folder dedicated to breaths of different types. Can be used in UTAU or in an external editor.
Inhales: 息, br (5 different types ex: 息1, 息2, etc)
Soft Exhales: ahh, ehh, ihh, ohh, uhh, nhh
Stand-alone Exhales: 息-, 息2-, etc.
Using Vocal Fry and Breaths (Inhale and Vocal Fry)Using Vocal Fry and Breaths (Standalone exhale & soft exhale end breath)
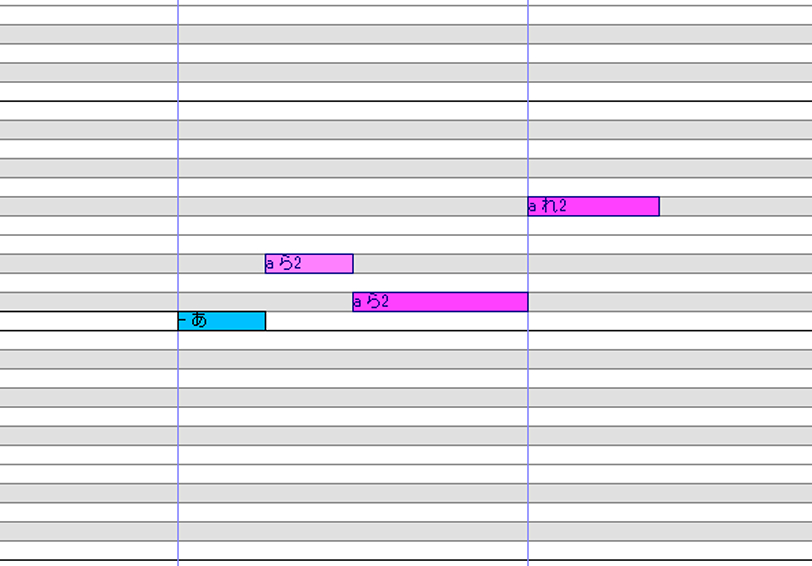
Extraswith THEIA OG03 MONARCH:
Western L notes:To use western L VCV notes (La, Le, Li, Lo, Lu): Add “2” to the end of Japanese R notes (ex: a ら2)
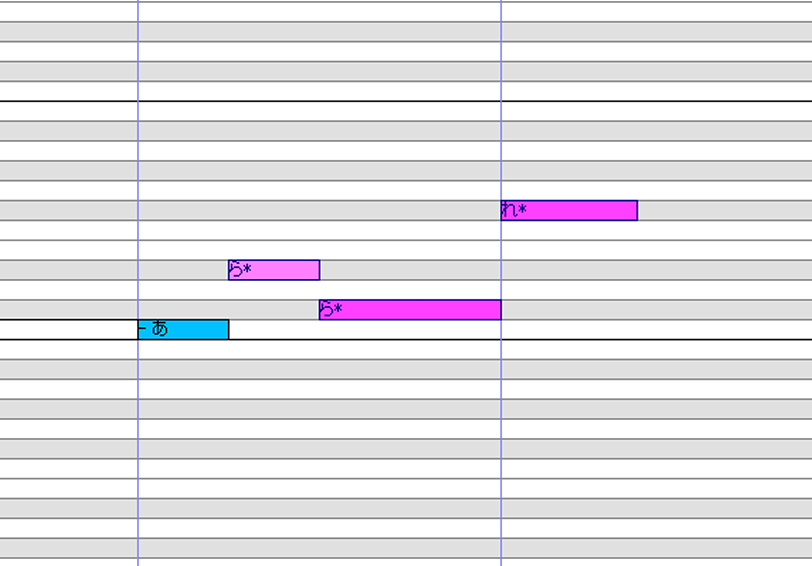
Growl:Add * for the suffix (ex: あ*).
Growl is in CV Format.
Making Growl More Powerful:
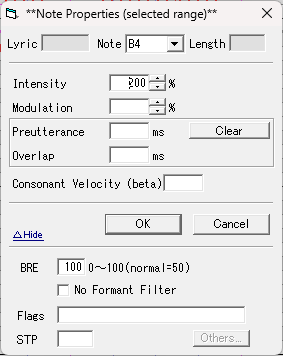
Select all the notes, then open the Notes Property window.
Clear the Preutterance and Overlap, and click the STP box. Afterward, change the Intensity to 200 to amplify her general output, then change the BRE setting to 100.
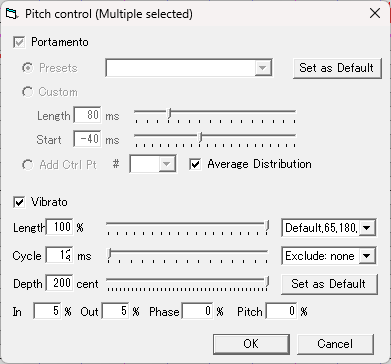
Next, open the Pitch Control window. Check the Vibrato button and set the Length to 100%, Depth for 200%, then finally the Cycle for 12% (this will reset if you click on another box, so do this last).